Thursday, October 15, 2020

Getting started with the find command.

Getting started with the find command.

Introduction

In this article i will walk you through a simple introduction to the unix command find.
I will cover the basic use of it and the options/flags that I find myself using the most often and which I think will be the most use to a new user.
So let's get started teach you how to use find.

Find

The basic use of find is to find files and directories. It can be used as a simple search or using the options to it, make it a very complex search.
As with all unix commands, I highly recommend reading the manual page for it. It will teach you everything you need to know and then some about using find.
The first thing to learn about find is that simply typing find with no arguments will list all files and directories contained inside the current directory.

find with no arguments or options.

From the printout you can see that find prints the contents of the current directory and descends down into all sub-directories as well.
For this example I have a parent directory "test" and inside that I have 6 files.
I also have a subdirectory named "level_2" which also contains 6 files.
Inside of "level_2" is a subdirectory "level_3" which contains 6 more files.

-type

passing -type to find allows you to specify a type of file you are looking for.
You can specify the type by passing a single character representing the type.
the two which I find myself using the most are:

  • f specifies that you are looking for a regular file.
  • d specifies that you are looking for a directory.

Let's look at an example of each.
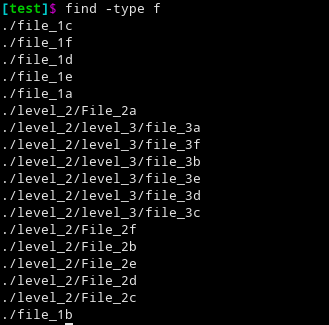
find using the -type f option.

here we tell find that we want to search based on type and that the type we are looking for is a regular file.

find using the type -d option.

here we tell find that we want to search for directories.

-name

-name option allows you to search using a case sensitive regex pattern.
the pattern is applied to the name of the file, and if a match is found, the file name is printed to screen.
Below you can see an example of a case sensitive search for any file with the name "file".
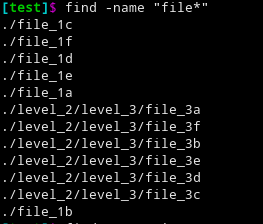
find using the -name option.

-iname

-iname is exactly like -name except that it is case insensitive.
Below you can see and example of a case insensitive search for "file".
This search finds both "file" and "File".
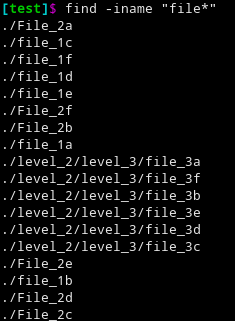
find using the -iname option.

Chaining options

You can chain together multiple options with find to further refine your search.
In the example below we combine -type d with -name "*2".
This searches for directories then applies a case sensitive search for names ending in "2".

using find with multiple options.

Controlling depth

You can control how deep or shallow a search is by using two options.

  • -maxdepth controls max number of subdirectories to descend down into.
  • -mindepth tells find not to search in any directory above this level.

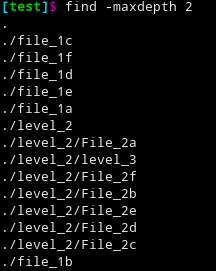
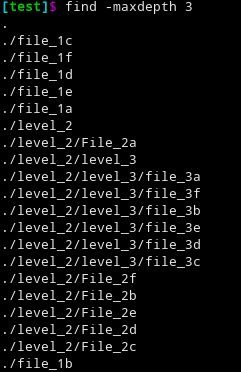
Below you can see a few different levels of -maxdepth from 1 to 3.
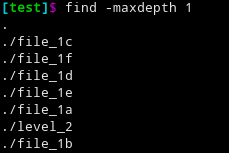
maxdepth 1
maxdepth 2
maxdepth 3

As you can see, -maxdepth 1 search only in current directory
-maxdepth 2 searches this directory and one level below it.
-maxdepoth 3 searches this directory and up to two levels below it
The following examples below shows using two levels of -mindepth.
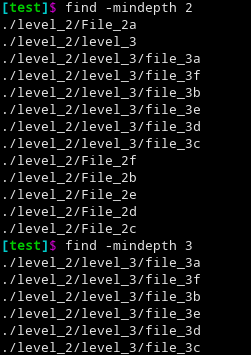
using -mindepth with find.

-mindepth 2 searches every directory at least one level below the current directory
-mindepth 3 searches every directory at least two levels below the current directory.

-delete

The option -delete deletes any files which match the search criteria.
The example below shows using find to delete all files beginning with "F".
This example also shows chaining together options, in this case -name and -delete.

using option with find.

As you can see, we have deleted all files which start with a captial 'F'.

-exec

The option -exec allows you to pass each found file to another unix command or program.
It passes each file individually one at a time to the command or program to be executed.
Two things to note about the -exec command are:

  • {} is the file which was found in the search.
  • \; The '\' escapes the semi-colon so that find knows it isn't part of the -exec command.
    • the semi-colon is needed in order to tell find when the exec command ends.
using the -exec option with find.

In the above example we search for all files staring with "F" (which are all in the level_2 directory) and then send them to the mv command.
Here we are moving each found file to the directory "test".
We can verify that it worked with the output from ls.

-ok

The -ok command works exactly like -exec but it first prompts you each time before executing the command for each found file.

using -ok option with find.

We search for then move all files starting with "F" as with the -exec option, but this time it prompts us each time before moving each file.

final remarks

I hope this tutorial was helpful to you in learning the basics of find.
It is a very useful and powerful command on any *nix system. I hope that you try it out and check out the man page for it
find has a ton more options than what I covered, some of them quite complex and powerful, so do please look into the other options.
Also remember that being a unix command, you can easily loop over the output using a while loop or pipe it into xargs to do some powerful stuff with it.
Thank you for checking out this tutorial. Please remember to check back for other tutorials on this blog.

Thursday, September 24, 2020

Simple Platformer - part 5

Getting started with Love2d - part 5

Introduction

Welcome to part 5 of my Love2d tutorial. In this part we are going to add tiles to the game.

Adding tiles

The first thing we need to do is to create three tile pieces. For this i used GIMP and made three simple squares.
Next create a directory called images and place the three tile pieces there.

Tile 1
Tile 2
Tile 3

The next thing to do is to create a file Tiles.lua.
Inside this file, the first thing to do is to create a tile map.
This is a 2d array using numbers to represent location of the tiles on the map

  • 0 represents empty space
  • 1 represents tile 1
  • 2 is tile 2
  • 3 is tile 3
Tile Map

For the next part, the steps are:

  1. Create an Icon object to hold icons. it should store:
    • icon for the tile created with love.graphics.newImage()
    • width of icon using getWidth()
    • height of icon. Use the function getHeight()
  2. Create Icon list.This is a list to hold the Icon objects.
  3. Create a function which populates the icon list with the three icons tile1, tile2, and tile3.
  4. A function to loop through the tile map and print each tile.
    • We use a nested for loop to loop through the tile map.
    • If the tile isn't zero then we print the corresponding icon from icon_list using the number in Tile_Map.
Tile objects and Tile list

Modifying main.lua

We now need to make a few changes to main. We need to call our new code and we clean up a few things we previously added.

New stuff to add

  • Icon_List:populate we call the populate function in our love.load() function.
  • drawTileMap() We add this function to love.draw() in order to draw the tiles on each update.

Cleaning up older stuff

We now clean up some of our older code to improve our main.lua file.

  • we change our player construct function to use an image icon using love.graphics.newImage().
  • we change our enemy construct function to use an image icon directly.
  • we change the values for WIDTH and HEIGHT to accommodate our new tile map.
updated main.lua

Updating Characters.lua

We now make a few changes to our Characters.lua file.

  • o.icon = icon we set the objects icon to the icon we pass to it. No more calling love.graphics.newImage()
  • o.y = y - o.oy we adjust the y position to account for the y offset.
Updated Characters.lua

Sunday, September 6, 2020

A quick look at Wren.

Wren - A quick introduction

Introduction

Welcome to my quick introduction to the Wren Programming language.
In this post i will be covering the basics of this interesting little language.
I hope by the end you have not only learned a little about Wren, but you have had your interested piqued by it like mine has been.


What is Wren

  • Wren bills itself as a "Small,fast,classed-based concurrent scripting language."
  • It is a small embeddable scripting language written entirely in C99.
  • It has syntax which is familiar to C.
  • Wren is based abound classes. OOP here we come.

Variables

Variables are one of the most basic parts of a programming language.
In wren, unlike C, you don't need to declare the type of the variable.
Variables are declared using the var keyword.

  • var name = value declares a variable name containing value
  • var can hold int,floats,bools,strings,lists,objects,functions,etc.
  • vars can then be reassigned from one type to another.
declaring and using variables in Wren.Find the code here.

Lists

Creating and using lists in wren is very simple.
List are dynamic, meaning they have no fixed size.
They can also hold a mixed of different types at once.
Lists can also be used as a map or dictionary.

  • lists start at 0.
  • lists can hold many different types at one.
  • negative index values start at the end of the list and go backwards.
Lists in wren.Find the code here.

Lists can also be used as a map/dictionary.
Keys can be almost anything:strings,variables,numbers,objects,etc.
values can also be almost anything.

Maps in Wren.Find the code here.

Control flow

Control flow in wren is very similar to C.
if statements are near identical.
wren uses the same set of operators such as == and <
The only difference with C you need to watch out for is 0 is evaluated as true.

Control in wren.Find the code here.

while loops in wren look identical to C while loops. Nothing to explain here
for loops are a bit different. You loops over a range or over a list.
Lists can be created in the loop or you can use a list which was created prior to the loop.
To loop through a map you use mapname.keys or mapname.values.

loops in wren.Find the code here.

Classes and Objects

Wren is based around classes. But luckily wren makes classes very easy.
Anyone familiar with most OOP languages will get this stuff very easily.
Even without an OOP background it is fairly easy to get.

  • class name {}
    • make a new class called name.
  • construct new(args)
    • constructor for the class.
  • _fieldname
    • declare a field for the class named fieldname
  • methodName=(value) {})
    • declare methodName a setter for the class.
  • methodName {_fieldname}
    • declare methodName a getter for class.
  • class childclass in parentclass
    • declare childclass to be a child class of parentclass.
  • super
    • calls the method or field in the parent class.
classes in wren.Get the code here.

Final remarks

Thank you for checking out my introduction to Wren. I hope you find the language as interesting as I do.
I will be covering embedding wren into C in a separate blog poster later on. Hope to see you there.
For those looking to make games, there is a Game engine using wren.
I also suggest you check out the wren wiki for more info,libraries,projects,and applications.

Thursday, September 3, 2020

Quick look at the C preprocessor

Getting started With the C preprocessor

Introduction

Welcome to my blog post exploring the basics of the C preprocessor.
The C preprocessor is a macro processor which is used as part of the process of compiling C source code.
Macros are widely used when doing C programming, and a knowledge of how to use the C preprocessor will help you be a better C programmer.
All example code was testing used both GCC and Clang running on manjaro linux. Results may vary on other compilers and/or O.S.
From here on the C preprocessors will be abbreviated as 'CPP'


Basics

This first example will illustrate the very basics of macros.
This example has the preprocessor include a file, and also define two macros.

  • #include <filename>
    • this has CPP include the contents of filename into the current file.
  • #define macro body
    • The CPP replaces all occurrences of macro with body

In the follow example, we include stdio.h header into our file so that we have access to printf().
We also define a macro for PI which expands out into 3.14159 and one called str.
The code then shows a few examples of these macros being used. Nothing fancy or complicated but i think you get the idea.

Macros in C. code

Function like macros

We now move on to function like macros.
These are macros that we can use like functions.

  • #define name(args) body defining a function like macro which can accept arguments.

To call a function like macro is very similar to calling a normal C function.

  • name(args) calls a function like macro name with args.

In the example code, we create a function like macro which takes in a number and returns the square of it.

Function like macros in C. code

External files

This example we cover defining macros in another file and then using them in our current file.
We first define them in a file macros.h then include that in our file.
We can then use those macros in the current file just as before.

  • #define "file" search for file in same directory as current file then include it into our current file.
Defining macros in an external file. code
External macros in macros.h. code

Conditional processing

We can use if like statements to conditionally control the CPP.
Depending on whether the conditions are true or false we can control how certain macros are handled or even if they exist in the file at all.
If you already understand if statements as they are regularly used in programming then this should be easy to understand.

  • #if simple if statement. Checks for true/false
  • #elifsame as an else if.
  • #elsean else statement
  • #ifdefif defined. Checks if a macro is defined, and if is, returns true,otherwise returns false.
  • #ifndefif not defined. Checks to see if a macro is not defined.
  • #endifEnds a if block.

In the example code we first create two macros to use.
We then use conditionals to conditionally define other macros which we then use in main()
In our code we also introduce #undef which undefines a macro.
try commenting out #undef X and also try defining a macro 'A' to see how this affects the output.

Conditional processing in C. code

Predefined macros

In this example I cover some common predefined macros.
These are macros which the complier already defines.
Some Caution, not every single one of these may be included in every single C compiler.

  • __FILE__ returns the name of the file.
  • __LINE__ returns the line number.
  • __COUNTER__ a counter which starts at zero and increments by 1 on each call.
  • __func__ returns the name of the function it is inside of.
  • __DATE__ returns the current date.
  • __TIME__ returns the time at which the CPP started running.
Predefined macros in C. code

Debugging using the CPP

This example will show a simple way to turn on/off debugging messages using conditionals and the CPP.
When DEBUG is defined as 1 and/or DEBUG_ALT is defined, debug messages get printed to STDERR.
Also shown is how to use a conditional to turn off a block of code without needing to delete it all or comment it all out.

Debugging using conditionals with the CPP. code

Macros with variable arguments

In this example we improve on our debugging by introducing variadic macros
These are macros which can take in a variable number of arguments.
We use them to handle the multiple arguments to a call to frpintf()

  • #define macro(...) body
    • (...) this indicates that the macro can take variable arguments.
    • __VA_ARGS__ This represent the variable arguments.
      • this will expand out into each argument in the order that it was passed to the macro.

Using VA macro we can now call DEBUG_MSSG() with as many arguments as we need to handle our fprintf call.

macros with variable arguments. code

Using the CPP by itself

The CPP can be used as a standalone macro processor.
It is very limited in its functionality in this respect compared to a dedicated general purpose macro processor like m4.
But still, it can be put to some use.
Some reasons to use it as a standalone preprocessor:

  • Debug your macros
    • you can view how your macros expand out so you can check for errors.
  • learn more about macros
    • viewing how the CPP expands macros can help you learn about macro expansion.
  • general macro processor
    • Use it in place of a dedicated general purpose macro processor.

There are a few ways to call the CPP by itself.
On a GNU/Linux system i know of three ways:

  • CPP file
    • process file and prints result to stdout.
  • gcc -E file
    • tells gcc to compile file but to stop after it runs the preprocessor.
  • clang -E file
    • tell clang to compile file but to stop after running the preprocessor.

When using the CPP by itself, I recommend using the flags

  • -P
    • This will stop the CPP from generating linemarkers.
  • -C
    • this will keep comments. Normally CPP removes comments from files.

Comparing .c files to output of CPP

Below you can see the output of example1.c after running it through CPP.
You can see how the CPP expands the macros PI and str.
Compare this to the file example1.c to see how the CPP alters it.

output of CPP on example1.c

Using CPP as genreal purpose macro expander

In this example I use the CPP to exand macros into html tags.
This illustrates an example of how it can be used as a general purpose macro expander.
It also illustrates the weakness of using the CPP as such.
The CPP is designed for C code, when you try to use non standard C code with it, you can run into issues.

using CPP to expand macros into html tags. code
using the CPP for html tags

Run the CPP on this file and saving it as an .html file.
Inspecting the file reveals it to generate a valid html file. all macros expand properly.

html file generated by the CPP. code

You can then open the saved .html file in a browser to verify that it works.
So you see, it can be done, it's just not the best tool for the job.

opening the html file in a browser

Final remarks

The CPP provides some neat functionality to C programming.
In this post I have show the basics of its use when doing C programming, but also how it can be by itself.
To go further, I recommend you read the guide on the GCC preprocessor here.
All example code featured here can be found on github.

Friday, August 28, 2020

Lua quick start guide

Quick start guide to lua

Introduction

This is my quick and basic introduction to lua.
In this guide i will quickly walk you through the basics of lua.

What this guide is not

This guide is not a step by step introduction to programming.
Nor will this guide cover a bunch of computer science concepts.

What this guide is

This guide assume you have some understating of programming and computer science.
This guide is simply a quick introduction to the basics of lua.
This guide assumes you are familiar with basic programming and want to cover the basics of lua.

Install basics

This guide wont go into the details of installation and running a lua program.
That information is pretty well conveyed by the lua website.
once you have lua set up you can continue the rest of this guide.

The Basics of variables

The very first thing to learn is how lua handles variables.
With lua there is no type declarations or even a var keyword.
To use a variable, simple use the variable name and assign it a value, as seen in example below
You can find all the example code used in this guide over on github.

Variables in lua
Example of using variables in lua

Variables can be assigned to any type of data, int, floats, strings, etc.
Variables can also be reassigned to a different type.
For example, a variable holding a string can then be assigned to hold an int.
By default all variables are global. To make a variable local, use the local keyword.

Local variables in lua
local variables.

Functions

Functions are declared by using the function keyword.
Return types are not declared as they are in languages such as C.
Functions are closed with the end keyword.

functions in lua
functions in lua.

Functions declared local have their scope limited the same as variables.
Local functions can only be called below them in the file.
Local functions can be quicker than non local function.

Functions can return no data, a single variable, or many variables.
Functions return multiple items as separate variables.
If you try to assign more variables to a function than it returns, the excess variables are assigned the value nil

tables

Tables are lua's storage device.
Understanding tables is a very big key to being good at lua.
Tables can be used as dynamic arrays are used in other languages.
Tables can also be used like associative arrays or dictionaries.
You can store almost anything you want in a table,and aren't limited to a single data type per table.
One thing to keep in mind: Tables start at 1 not 0.

tables in lua
Tables in lua.

Inserting data into tables

inserting elements into tables
Inserting elements into a table.

There are two main ways to insert data into an array: using an index and using table.insert()
There are two forms of table.insert():

  • table.insert(mytable,element)
    • This will place the element at the end of the given table.
  • table.insert(mytable,index,element)
    • this one inserts the element at the given index into the table.

You can also assign the return data from a function to be elements in a table.
When assigning from a function returning multiple items, each item will be a sequential element in the table.

Retrieving data from table

Accessing elements in tables
Retrieving data from a table.

Retrieving data from a table used as an array is simple: just use the index like you would in most other language.
For tables used as associative array/dictionaries, you have two options:

  • use the key in mytable[key] like using an index.
  • Use mytable.key.

Removing elements from a table

Removing items from a table is easy, just use table.remove(mytable,index).
For an associative array/dictionary table, set the key to nil to remove the key,value pair.

Removing elements from a table
Removing elements from a table.

sorting tables

Sorting tables is pretty easy. lua includes a built in quicksort for this.

sorting tables in lua
sorting tables.
  • table.sort(mytable)
    • This sorts the elements in the given table numerically.
  • table.sort(mytable,compr)
    • this version takes in a function to do the comparison.
    • Using a custom compare function lets you sort elements in a table however you like.

That covers the basics of using tables. But to get really good, you should read up on metatables.
Metatables cover the inner workings and properties of a table.
You can get tables to do some interesting things by changing its metatable.

Printing

Printing to stdout is fairly simple
The standard way to do so is to use io.write()
Lua does have a print() function, but io.write() is the standard one to use.

printing to STDOUT in lua
Print to stdout.

Control flow

If you are familiar with any other modern programming language, then this section should be familiar.
Only things to note are lua syntax specific things such as:

  • if statements need an end just like functions.
  • Lua uses and for logic AND.
  • Lua uses or for logic OR.
  • Lua uses ~= for not equal to.
  • Lua uses not for logical NOT.
  • elseif is one word.
Control flow in lua
control flow in lua.

Loops

Loops in lua should be easy to grasp for anyone with programming experience.

  • Syntax for a standard for loop is var=start,stop,increment do.
  • repeat until("condition") loops until condition in until() is true
    • So you can think of it like a do while() loop but the condtion is reversed
  • ipairs() iterates over a table giving you an index and element on each iteration.
  • pairs() iterates over a table giving you a key and value on each iteration.
  • loops need an end just like functions and if statements.
Loops in lua
Loops in lua.

File I/O

Basic file I/O is fairly simple.
The example code pretty much sums up the basics.
There are a few functions such as fseek() and flush() which are not covered here.
I felt that those functions were beyond the scope of my very basic introduction guide.

Reading files in lua
Reading files in lua.
Writing files in lua
writing to files in lua.

Math functions

The math library for lua has the typical math functions you'd expect.
Again, if you have any programming experience then you probably already know these.
These are the basics, but lua has a few more.

Loops in lua
Math functions in lua.

String Functions

Some of the more commonly used and useful string functions in lua.
The only thing to take note of is that the regex flavor used by lua may differ a bit from what you find elsewhere.
Needles to say, but a look at the lua reference on regex would be beneficial.

String functions in lua
string functions in lua.

Final remarks

Thank you for checking out my basic introduction to programming in lua.
I intentionally left out things which I felt were beyond the basic scope and goal of this guide.
Two big things which are missing are metatables and OOP.
I felt that there is just too much to cover for those topics and they each deserve their own separate posts.
You can find all the example code used in this guide over on github.