Introduction
In this article i will walk you through a simple introduction to the unix command find.
I will cover the basic use of it and the options/flags that I find myself using the most often and which I think will be the most use to a new user.
So let's get started teach you how to use find.
Find
The basic use of find is to find files and directories. It can be used as a simple search or using the options to it, make it a very complex search.
As with all unix commands, I highly recommend reading the manual page for it. It will teach you everything you need to know and then some about using find.
The first thing to learn about find is that simply typing find with no arguments will list all files and directories contained inside the current directory.
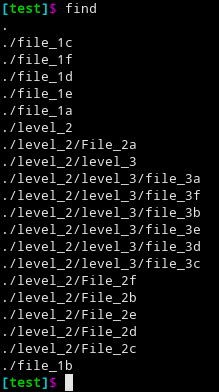
From the printout you can see that find prints the contents of the current directory and descends down into all sub-directories as well.
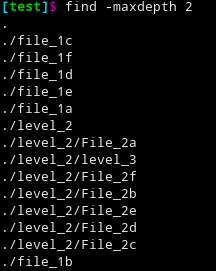
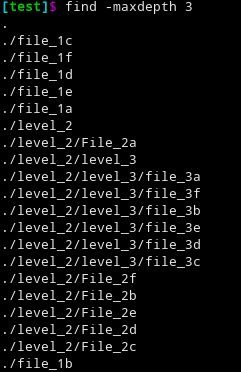
For this example I have a parent directory "test" and inside that I have 6 files.
I also have a subdirectory named "level_2" which also contains 6 files.
Inside of "level_2" is a subdirectory "level_3" which contains 6 more files.
-type
passing -type to find allows you to specify a type of file you are looking for.
You can specify the type by passing a single character representing the type.
the two which I find myself using the most are:
fspecifies that you are looking for a regular file.dspecifies that you are looking for a directory.
Let's look at an example of each.
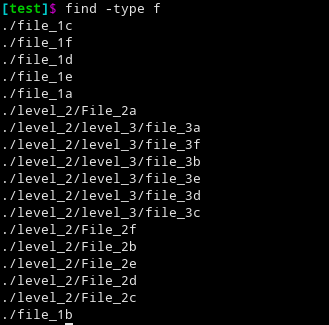
-type f option.here we tell find that we want to search based on type and that the type we are looking for is a regular file.

type -d option.here we tell find that we want to search for directories.
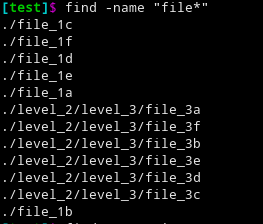
-name
-name option allows you to search using a case sensitive regex pattern.
the pattern is applied to the name of the file, and if a match is found, the file name is printed to screen.
Below you can see an example of a case sensitive search for any file with the name "file".
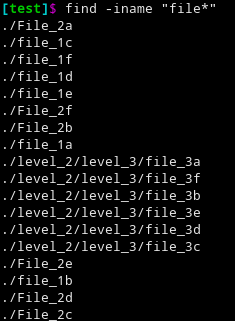
-name option.-iname
-iname is exactly like -name except that it is case insensitive.
Below you can see and example of a case insensitive search for "file".
This search finds both "file" and "File".
-iname option.Chaining options
You can chain together multiple options with find to further refine your search.
In the example below we combine -type d with -name "*2".
This searches for directories then applies a case sensitive search for names ending in "2".

Controlling depth
You can control how deep or shallow a search is by using two options.
-maxdepthcontrols max number of subdirectories to descend down into.-mindepthtells find not to search in any directory above this level.
Below you can see a few different levels of -maxdepth from 1 to 3.
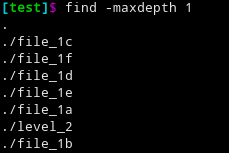
As you can see, -maxdepth 1 search only in current directory
-maxdepth 2 searches this directory and one level below it.
-maxdepoth 3 searches this directory and up to two levels below it
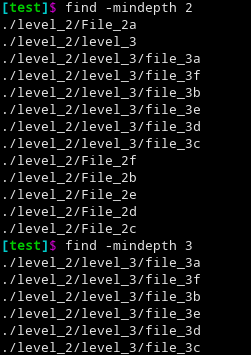
The following examples below shows using two levels of -mindepth.
-mindepth with find.
-mindepth 2 searches every directory at least one level below the current directory
-mindepth 3 searches every directory at least two levels below the current directory.
-delete
The option -delete deletes any files which match the search criteria.
The example below shows using find to delete all files beginning with "F".
This example also shows chaining together options, in this case -name and -delete.

As you can see, we have deleted all files which start with a captial 'F'.
-exec
The option -exec allows you to pass each found file to another unix command or program.
It passes each file individually one at a time to the command or program to be executed.
Two things to note about the -exec command are:
{}is the file which was found in the search.\;The '\' escapes the semi-colon so that find knows it isn't part of the -exec command.- the semi-colon is needed in order to tell find when the exec command ends.

-exec option with find.
In the above example we search for all files staring with "F" (which are all in the level_2 directory) and then send them to the mv command.
Here we are moving each found file to the directory "test".
We can verify that it worked with the output from ls.
-ok
The -ok command works exactly like -exec but it first prompts you each time before executing the command for each found file.
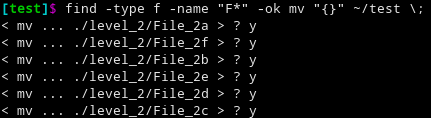
-ok option with find.We search for then move all files starting with "F" as with the -exec option, but this time it prompts us each time before moving each file.
final remarks
I hope this tutorial was helpful to you in learning the basics of find.
It is a very useful and powerful command on any *nix system. I hope that you try it out and check out the man page for it
find has a ton more options than what I covered, some of them quite complex and powerful, so do please look into the other options.
Also remember that being a unix command, you can easily loop over the output using a while loop or pipe it into xargs to do some powerful stuff with it.
Thank you for checking out this tutorial. Please remember to check back for other tutorials on this blog.
No comments:
Post a Comment